Report Editor
Build the PDF the customer gets: one block per part, plus photos and findings.
How to get there
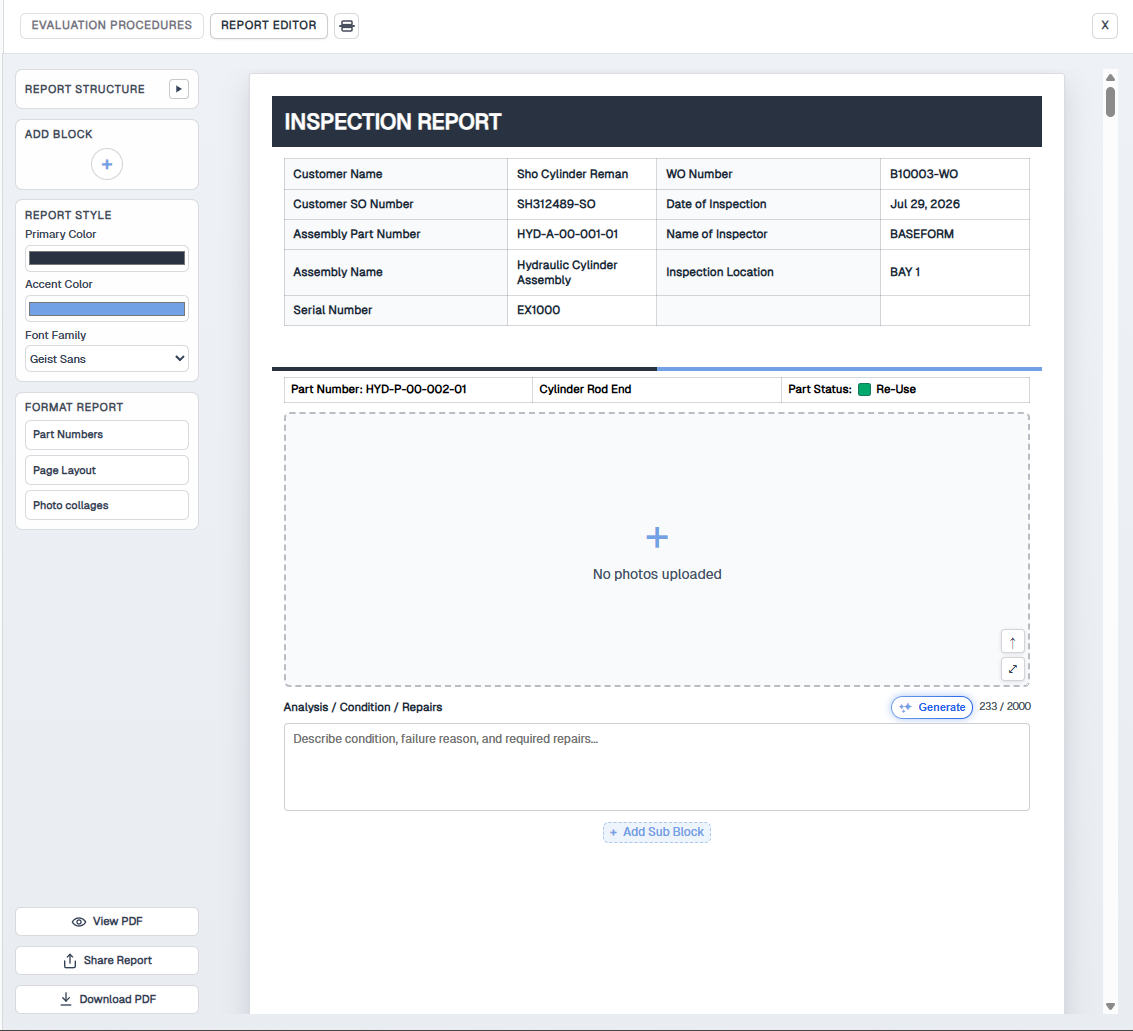
In the Model Viewer, click Report Editor in the top-right dock. The panel opens beside the model. Switch to Evaluation Procedures in the same dock, or use split view to stack both.
Before you start
Set part status in the Model Viewer first—or know that Awaiting Status will look unfinished on the PDF. Photos on the part block help Generate. The first blocks come from the uploaded assembly.
You do not edit the report header on the canvas. The summary table at the top is a preview. Open the inspection card in the left sidebar, click ⋮ then Edit, change the fields, and Save.
How to use the Report Editor
- Confirm the header — You do not edit the header on the canvas. Open the inspection card in the left sidebar, click ⋮ then Edit, and change the header fields and values—customer, work order, inspection date, inspector, location, serial number, and any Include options (WO, Customer, OEM, Manufacture). Click Save. The Report Header on the canvas updates to match.
- Work through each part block — Use Report Structure in the sidebar to jump to a part. Check the part number, name, and status, then add photos and analysis on that block.
- Add photos — Click the dashed photo area (or Upload) on a part block. Add shots from the camera or pick existing images from the Photo Library. Follow the Photo Guide when a part has one.
- Write or generate analysis — Describe condition, failure reason, and required repairs in the text area. Use Generate to draft from photos and part context, then proofread. Customize prompts in Report Writing.
- Add blocks as needed — Use Add Block for a title page, header, extra part block, repair list, parts kit list, part status list, or appended PDF. Use Add Sub Block inside a part for nested photos, tables, or extra analysis.
- Match company branding — Under Report Style, set primary color, accent color, and font family. Format Report opens Part Numbers, Page Layout, and Photo collages for how numbers, pages, and collages print.
- Preview and deliver — Use View PDF to proof the export, Share Report for a customer link, or Download PDF when the report is ready.
Report Structure
Report Structure is the outline of the report. Expand it in the sidebar to see every block in order—title page, report header, then each part. Click a row to scroll the canvas to that block.
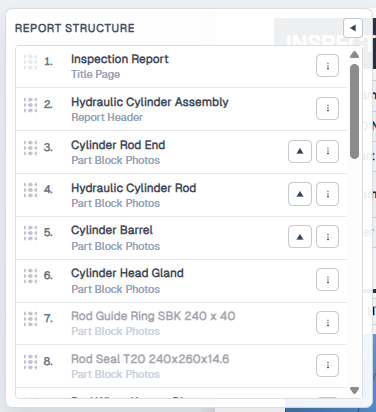
- Drag to reorder — grab the dotted handle on the left of a part block and drop it where it should appear. The canvas and the PDF follow the same order.
- Click to jump — click a block in the list to scroll the report to that place in the canvas.
- ⋮ menu — open the block menu on a row to add sub blocks, change block type, save a part block template, show or hide, or delete.
Block menu
Click ⋮ on a Report Structure row to open the block menu. Options depend on the block: part blocks can add sub blocks, switch layout, and save a part block template. Delete removes the block from the report.
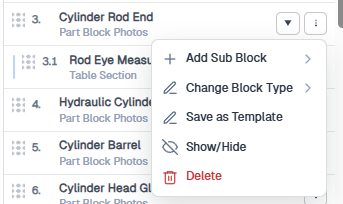
Add Sub Block
Hover Add Sub Block to open the flyout. Nest extra content under a part by choosing one of three types:
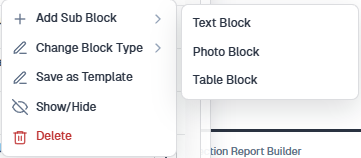
- Text Block — a free text area for notes, findings, or extra analysis that should sit under this part rather than in the main condition field
- Photo Block — a second photo collage, useful when one part needs separate views (for example overall vs close-up, or before vs after)
- Table Block — a measurement or checklist table. Edit rows, headers, and merged cells from the structure menu on that table
You can also add the same types from Add Sub Block at the bottom of the part on the canvas.
Change Block Type
Hover Change Block Type to open the flyout. Part blocks come in two layouts. Switch when the part's evidence does not match the current layout—photos stay on the block if you already uploaded them.
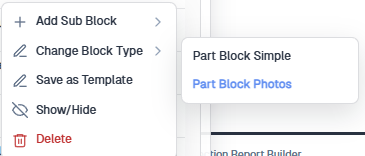
- Part Block Photos — part header, photo collage, then analysis
- Part Block Simple — part header and analysis only
See Report Blocks for how each layout looks on the canvas.
Save as Template
After you add at least one sub block, Save as Template stores this part's layout as a part block template in the Parts Library. There you can set it as the default part block for that part, so the same structure opens the next time the part is inspected. The template is scoped to this part number and the assembly part number on the report header—set both before you save.
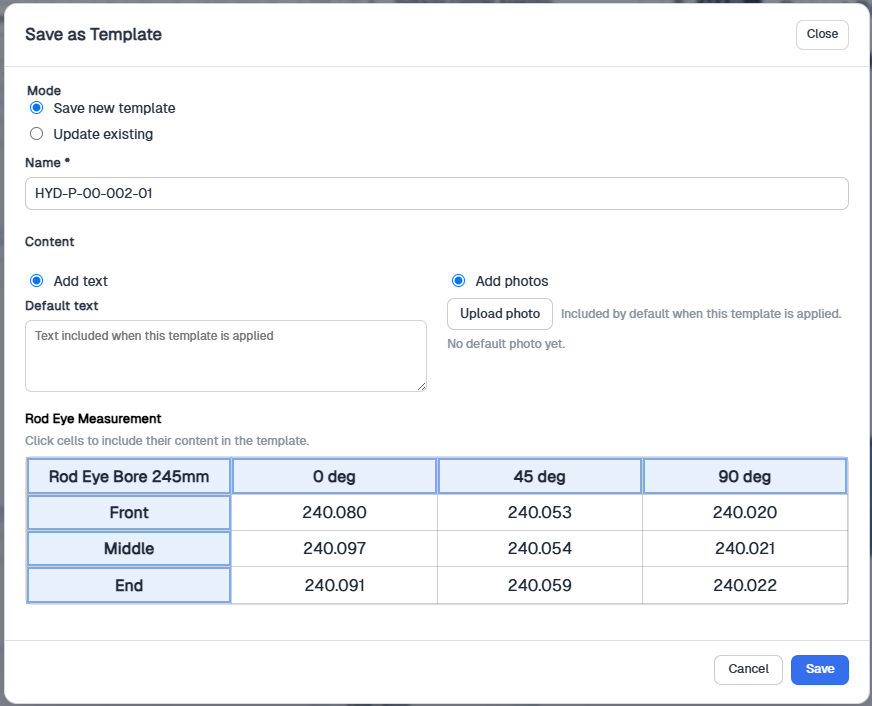
Choose Save new template or Update existing, then give it a name. Under Content, check Add text to store default analysis that fills in when the template is applied. Check Add photos to upload a photo that starts the collage so the next inspection already has a placeholder image. For table sub blocks, click cells to include their content (headers or blank measurement grids) without copying this job's unused values.
Show/Hide
Hide a block to leave it out of the canvas and the PDF without deleting it. The row stays in Report Structure so you can show it again. Use this for parts that were not inspected on this job, or that should stay off the customer copy while you keep the work on the report.
Recommended photos
Photos are the evidence in the report and the input Generate uses for analysis. Capture the shots the Photo Guide lists for each part. When a part has no guide, take a consistent set so the collage and PDF read clearly.
Overall view
Photograph the whole part in context so the reader can identify it. Include the part number or serial when it is visible on the component.
Multiple angles
Walk around the part. Front, back, both sides, and both ends give enough coverage for a photo collage and keep Generate from guessing about hidden faces.
Close-ups of wear and defects
Frame scoring, pitting, cracks, corrosion, seal damage, and thread wear so the finding fills the shot. Keep lighting even and the part in focus.
Mating and installation context
When status depends on how the part sits in the assembly, photograph the mating face, bore, or mounting area as well as the part itself.
Prefer a few strong shots over a crowded collage. Crop tightly around the finding in the Photo Collage Editor. Photos you upload here also appear in the Photo Library for the same report.
Report Blocks
After upload, the editor seeds part blocks (and optional title-page or customer blocks) from the assembly. Reorder blocks, apply a part block template from the Parts Library, and keep headings consistent so readers can scan long reports quickly.
Part Block Photos
Part header, photo collage, then analysis. Use this when the part needs inspection photos on the main block. Click the dashed area to add photos, then write or Generate analysis. Add Sub Block nests extra text, photos, or tables under the part.
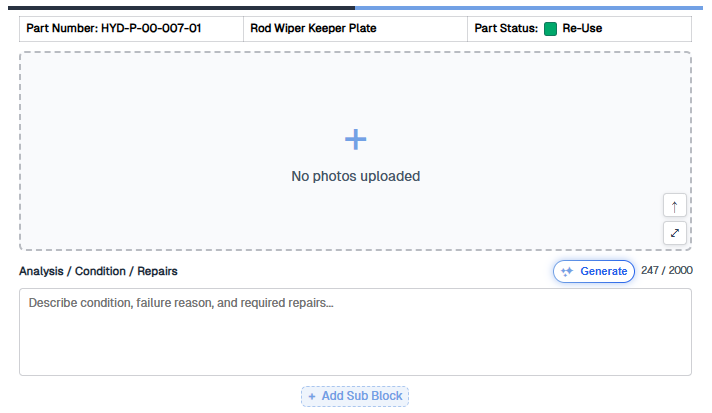
Part Block Simple
Part header and analysis only, no collage on the parent. Use this for parts that do not need photos, or when photos live in Photo Block sub blocks instead. Switch layouts from Change Block Type in the block menu.

Click the + under Add Block in the sidebar to insert extra sections. Title Page and Report Header appear in this list only if they are not already on the report.
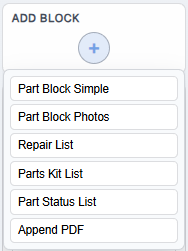
Add Block can insert:
- Part Block Simple and Part Block Photos — extra part sections
- Repair List, Parts Kit List, and Part Status List — assembly-wide tables
- Append PDF — supporting drawings or datasheets on the export (Pro)
- Title Page and Report Header — cover and summary fields, when they are not already in the report
Sub Blocks
Inside each part block, use Add Sub Block for a Text Block, Photo Block, or Table Block. Generate fills analysis from photos and measurements; you edit and proofread before export.
Photo collage
Part blocks can include a photo collage for inspection evidence. Open Format Report → Photo collages for default collage size. See the Photo Collage Editor guide for arranging, cropping, and rotating photos in a collage layout.
Part Lists
Repair List, Parts Kit List, and Part Status List blocks summarize the assembly in tables. Add them from Add Block when the customer needs a packed list in addition to the part-by-part narrative.
Review and delivery
- Proofread AI-assisted passages against measurements and photos before release.
- Export a PDF from View PDF or Download PDF. The Individual plan includes unlimited PDF downloads without company branding. On the Pro plan, your company logo and name appear on exported PDFs, and you can append supporting files (datasheets, drawings, or other documents) to the export.
- On Pro, Team, and Enterprise, click Share Report between View PDF and Download PDF. Set an optional password, expiry date, and view-only (no download). The customer opens a PDF-only snapshot. Revoke links from Account → Share links.
If you get stuck
- Generate with no photos — add shots to the part block first, or expect a thin draft.
- The header did not change — you edited the canvas preview. Use the inspection card ⋮ Edit instead.
- Share Report is missing — it is Pro (and Team or Enterprise). Download PDF still works on Individual.
- A PDF credit or quota prompt appears — see Account, plans, and sharing.
- Kit-tagged parts have no full narrative block — that is expected. They go in a Parts Kit List. See the FAQ Why do parts need to be labeled with Kit?.