Evaluation Procedures
While you look at a part, run your shop's checklist, notes, repairs, and photo list.
Before you start
Use this panel while you inspect: checklists, notes, and which photos to take. Use the Report Editor when you are writing the PDF. Build reusable catalog procedures later in Global Settings or the Parts Library—if the picker is empty, add procedures there first.
How to get there
In the Model Viewer, click Evaluation Procedures in the top-right. The panel docks beside the model. Switch to the Report Editor tab in the same dock, or use split view to stack both.
The panel
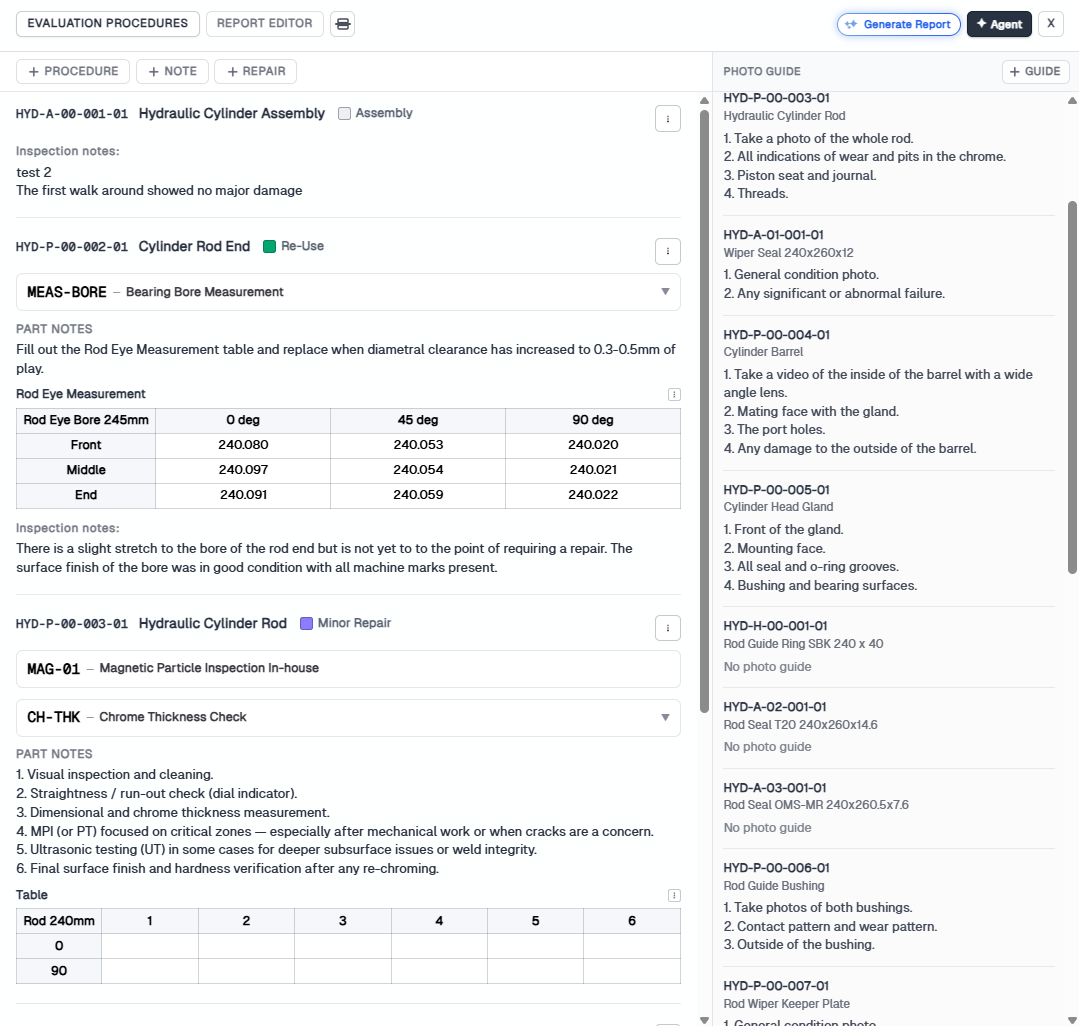
The left column lists each part in the assembly. A part card shows the part number and name, part status, linked evaluation procedures, measurement tables, inspection notes, and repairs. Expand a procedure row to fill tables or read the procedure notes.
The toolbar above the list adds work to a part:
- Procedure — link a catalog evaluation procedure to a part
- Note — add an inspection note for a part
- Repair — attach a repair code, a repair part number, or both
Generate Report drafts report analysis from the part, photos, and procedures. Treat it as a first pass and proofread. It requires Individual or higher. Agent opens the report agent for the same kind of draft help. Both stay available while the panel is open.
Part card
Each part card shows the part number, name, and status. Below the header you fill procedure tables, read part notes, and write inspection notes for this job.
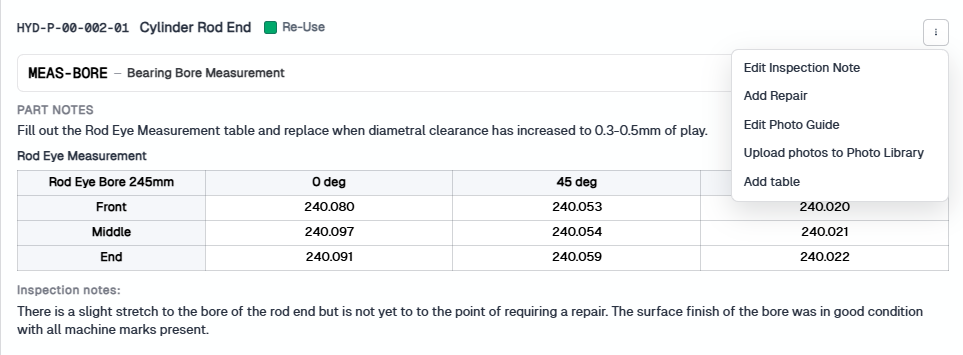
Open the ⋮ menu on the part header for actions on that part. Labels switch between Add and Edit when the part already has a note, repair, or photo guide.
- Edit Inspection Note (or Add Inspection Note) — write or update the inspection notes on this part for the current report
- Add Repair (or Edit Repair) — attach a repair code, a repair part number, or both. See Add repair.
- Edit Photo Guide (or Add Photo Guide) — add or change the photo instructions for this part. Same editor as Photo Guide → Guide.
- Upload photos to Photo Library — add photos for this part to the Photo Library
- Add table — add an extra measurement table on this part, in addition to tables that come from linked catalog procedures
Add procedure
Click Procedure in the toolbar, or use the part header menu. Choose the part, then search and select catalog procedures. You can also add required records, write instructions, and add extra tables on that part. Catalog procedures bring their notes, required records, and table templates when you save.
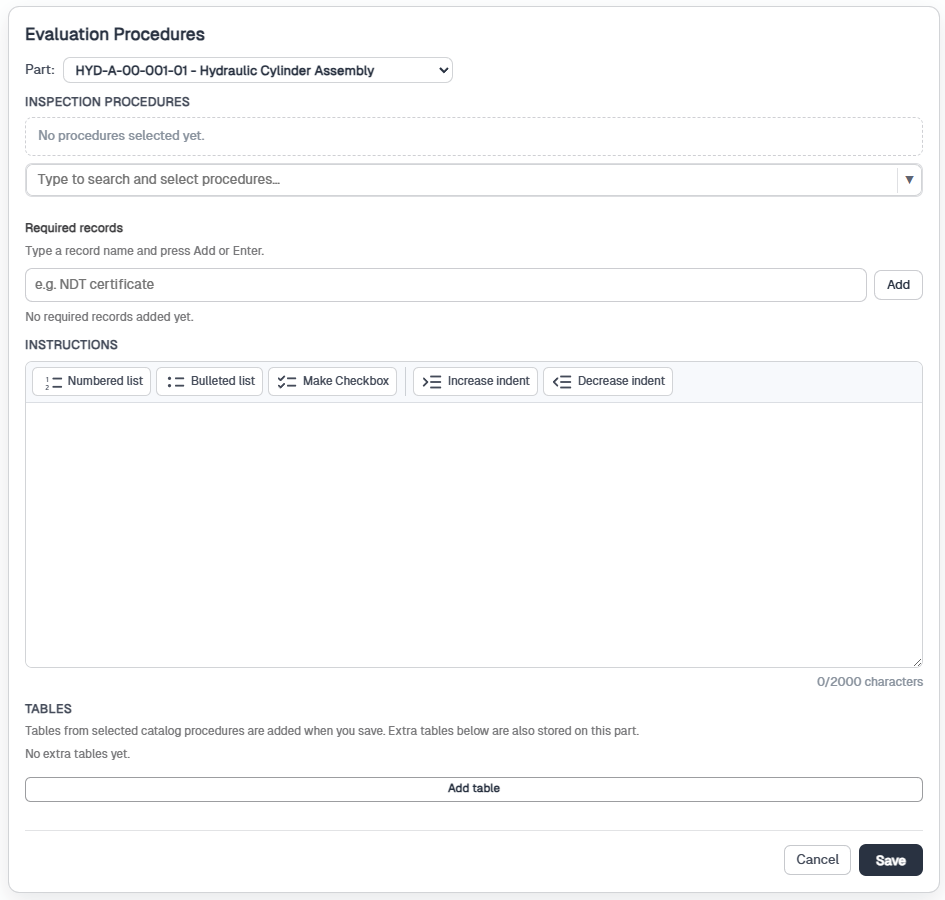
Catalog procedures are Internal or 3rd Party. Create and edit them in Global Settings → Inspection or in the Parts Library Evaluation Procedures catalog.
Add inspection note
Click Note to attach an inspection note to a part while you work. These notes live on the report for this job.
Catalog procedures can also carry their own inspection notes from the catalog. Those are separate from notes you take on a part in this panel.
Add repair
Click Repair in the toolbar, or use Add Repair on a part header. Choose a part, then add a repair code, a repair part number, or both.
Repair codes
Repair codes from Global Settings are general processes. Use them when the repair is straightforward and a standard process can be followed.
Repair part numbers
Repair part numbers come from the Parts Library Repair table. A library part can be given a repair part number for a repair on a certain section of that part, or when a very specific procedure is needed.
Photo Guide
The right column lists every part and the photos to capture for it. Parts without instructions show No photo guide.
Click Guide to add or edit instructions for a part. Describe the shots that should be taken so the inspection report has the right evidence. You can save instructions on this report only, or also on the part in the Parts Library so the next job on the same assembly starts with the same photo list.
Catalog
To create and edit procedure rows, open Global Settings and choose Inspection, or open the Parts Library and switch to the Evaluation Procedures catalog.
Each catalog procedure has a code, name, type, optional procedure notes, required records, and table templates. You can also add repairs and inspection notes that travel with the procedure when it is linked to a part.
If you get stuck
- No procedures in the list — the catalog is empty. Add rows in Global Settings → Inspection or the Parts Library Evaluation Procedures catalog, then return here.
- Generate Report is disabled — you are on Free, or the part has no photos or context yet. Individual and higher can Generate. See Account, plans, and sharing.
- Photos went to the wrong part — upload from that part's ⋮ menu, or assign the part number in the Photo Library (Pro).