Parts Library
Save this assembly's numbers, tags, and inspection defaults so the next job is not blank.
Before you start
You cannot type a blank catalog. Upload a CAD model, schematic, or BOM on a report, or pick Use existing on an inspection card. Confirm part numbers and names, then BlockForm writes those rows into the library.
How to get there
From the workspace, click Parts Library in the toolbar to open the Parts Library. Use Back to App to return to the workspace, or Refresh to reload the table. Global settings in the top-right opens the same catalogs used here for tags, inspection, repairs, OEM, and manufacture.
The library
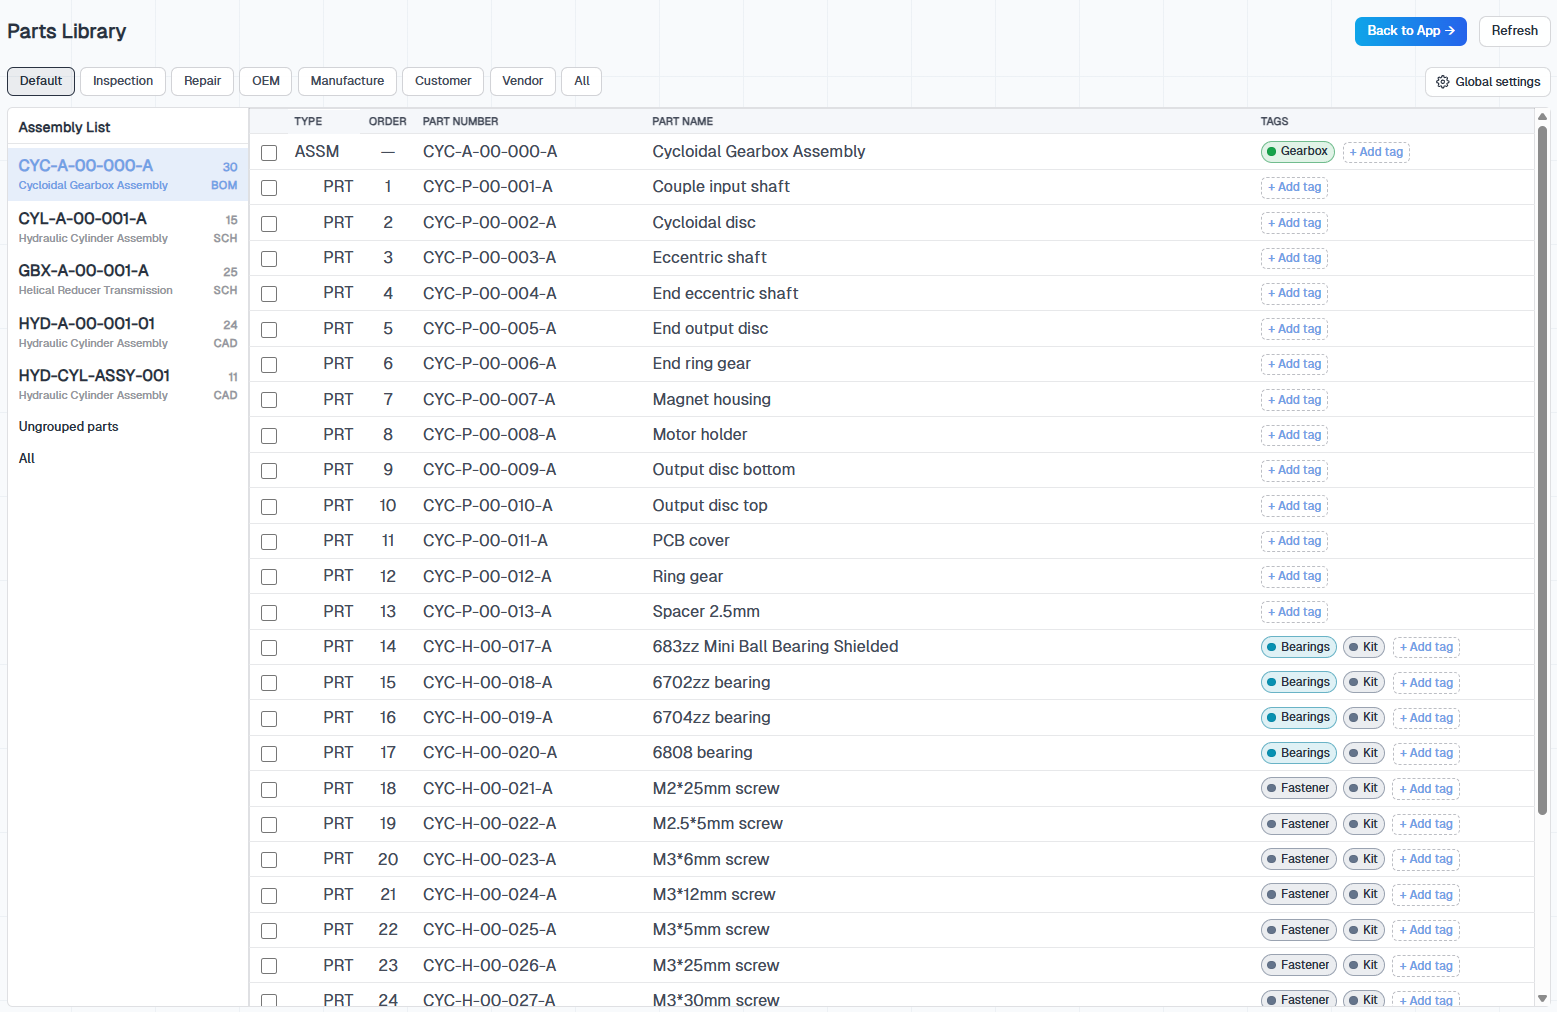
The left column is Assembly List. The right side is the part table for the selected assembly. Click a cell to edit part number, name, type, or tags. Changes save on that row and apply the next time the part appears in a report.
On the Default tab the table shows:
- Type — ASSM for an assembly, PRT for a part, SUB for a sub-assembly
- Order — the sequence of parts in the assembly
- Part Number and Part Name — the library identity used in the viewer, report, and search. Customize how new numbers and names are suggested in Part Naming and Numbering
- Tags — category pills such as Bearings or Fastener, plus Kit when the part belongs in a kit list
Assembly List
Each uploaded assembly appears in the sidebar with its part number, name, member count, and source (CAD, SCH, or BOM). Click an assembly to load its parts in the table.
- Ungrouped parts — rows that are not members of a selected assembly
- All — every library row in one table
From an inspection card you can also choose an existing assembly here instead of uploading again. See New Report and Upload.
Scope tabs
Tabs across the top change which extra columns you see. In plain terms: Inspection is how reports load; Repair is repair parts; OEM, Manufacture, Customer, and Vendor are who calls the part what. Default is the working view for numbers, names, and tags. The other tabs add catalogs that also live in Global Settings.
- Inspection — default part block, Photo Guide, and evaluation procedures for the report
- Repair — repair codes and repair part numbers linked to the part
- OEM — make, model, and OEM part number for the equipment being inspected
- Manufacture — supplier name and manufacture part number for the component
- Customer and Vendor — customer or vendor part numbers when those catalogs are in use
- All — every scope column in one table. Merge duplicates is available on this tab
Merge duplicates
On the All tab, click Merge duplicates when the same physical part was imported twice under different rows. Choose the uploaded assembly, then pick the two parts to combine into one library row.
Tags
Click + Add tag on a row to attach tags from Global Settings. Tags help the AI write the report, filter the Work Board, and group kit parts.
Kit
Add the Kit tag plus a category tag (for example Bearings or Fastener). In the Report Editor, a Parts Kit List block groups those parts by the category tag so fasteners and similar lines can appear as a compact list instead of a full part block each.
Inspection
Open the Inspection tab to set how this part appears in the report. Choose a built-in part block (Simple or Photos) or a saved part block template from Save as Template in the Report Editor. That choice becomes the default part block the next time the part is inspected.
Add a Photo Guide so Evaluation Procedures lists the shots to take. Link evaluation procedures from the catalog so measurement tables, notes, and repairs travel with the part. See Evaluation Procedures.
How parts are added
You do not create the library from a blank spreadsheet. Upload an assembly on a new report, confirm part numbers and names, then BlockForm writes those rows into the library. Later reports can pick the same assembly with Use existing instead of converting the file again.
- Upload CAD, schematic, or BOM from New Report and Upload
- Confirm part details so numbers and names stay unique across the shop
- Open Parts Library to tag parts, set inspection defaults, and link repairs or OEM data
- Use Merge duplicates on the All tab when the same physical part was imported twice under different rows
If you get stuck
- The assembly is not in the list — click Save on the inspection card after upload. Unsaved cards do not write the library.
- Duplicates after a second upload — open the All tab and use Merge duplicates.
- Kit parts still get a full block — open Inspection and Configure Inspection Report so kit-tagged parts use a kit list instead of a per-part block.